Working with Visual Basic Controls:
Visual Basic offers a set of controls which are placed in the toolbox. The additional set of components is provided in the component list.
The property and the methods of these classes can be access
through the object using dot operator
E.g Command1.caption=”Hello”
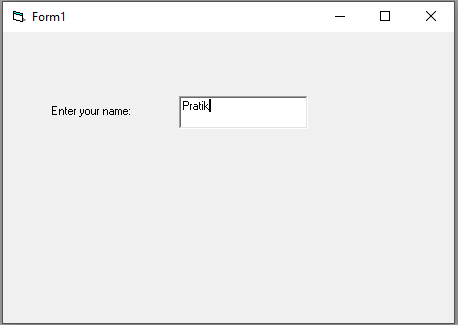
- Text
Box:The text box control is the
most commonly used to get the input from the user. The
text property of the textbox can be used to access the content of the
textbox control
 |
| Text Box |
Properties of Text Box:
· Enabled: Set whether the user is allowed to access the
control or not. If set to false the textbox is disabled.
· Locked: If we set to true that text box will not allow
the user to get the content of the text box. Unlike the enable property
if will allow to copy and paste the control of the textbox.
· Maxlength: Set the maximum length of the characters
that can be entered.
· Multiline: When the text exceeds the boundaries of
the control the text will be wrapping to the next line if the multiline
property is set to true.
· Passwordchar: The character to be displayed should be
entered here to hide the text from the user.
· Text: The text entered in the textbox limited to
2048 characters. If the multiline property is set to true then it is 32
KB.
· Visible: Set whether the control is hidden or visible. Setting if false hides the control.
2. Command Button: Command button is a three dimensional rectangular button, when the user clicks the button at run time VB invokes the code given in the click event.
Most visual basic applications have command
buttons that allow the user to simply click them to perform action.
Properties of Command Button:
· Backcolor: Set
the background color only if the style property is set to graphics (1)
· Caption: Set the text display on the button.
· Cancel: When this property is set to true then the button can be click using escape key.
· Picture: Set the picture is display on the button
if the style property of the button is set to graphics
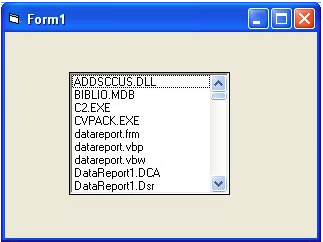
3. List Box: List box control display the list of items from which the user can select one or more. If the number of item exceeds the number that can be displayed, scroll bar is automatically added to list box control. By default the choices are displayed in the vertical columns although multiple columns can be set.
 |
| List Box |
Adding
Items: You can add items in
two ways that is design time and runtime.
Design
Time: At a design time by
setting the list property of the property window of the list box control.
Run
Time: You can add the
item in the list box at runtime by using following code
Private
command1_click()
List1.Additem
”Wardha”
End
Sub
Removing
Items:
List1.RemoveItem
0
Remove
item has one argument, index, which specifies the item to remove
To remove the currently selected item from the
list
Privates
of command1_Click()
List1.RemoveItem
Lis1.ListIndex
End
Sub
Clear
method
To remove all the items
from the listbox the clear method is used.
List1. Clear
Listcount property:
List count property returns the number of item
in the list box
Privates of command1_Click()
msgbox(“The number of Items in the List1”&
List1.ListCount)
End Sub
4. Combo Box: A combo box control combines the features
of text box and a list box. This control allows the user to select an item
either by typing text into the combo box, or by selecting it from the
list.
Combo box
presents a list of choices to the user. If the number of items exceeds
what can be displayed in the combo box, the scrollbar will automatically
appear on the control. The user can then scroll up and down or left to
right through the list.
 |
| Combo Box |
Unlike list box control, the user can select only one item at a time from the combo box.
The properties and methods of the combo box control is very much similar to list box.
Combo Box control Vs List Box control
Although both the combo box and list box control offers the list of options there are few differences between them.
1.
In combo box control the user can type text while the text cannot
be typed into the list box control
2.
User can select only one option at a time from the list of
available option, while in case of the list box control the user can
select the multiple options at a time
3. The list of items are displayed only in single column in the combo box control, while the items can be displayed in multiple columns in list box control.
5. Picture box: The picture box control is used to display
the graphics, to act as a container for the other control, and text
using print method
Picture box control is similar to image
control; each can be used to display graphics in your application. Each supports
the same graphics format.
Picture property: Picture property of the picture box control can be used to
set the picture in the picture box control. The picture property of the
picture box control can be set at design time as well as run time
Loadpicture() method : The Loadpicture()can be used to display the picture into the
picture box control at the runtime.
The path of the image to be loaded is passed
as an argument to the Loadpicture() method
 |
| Picture Box |
Private Sub Command1_Click()
Picture1.Picture= Loadpicture(“C:\ uranus.jpg”)
End Sub
Graphics methods: Picture boxes, like forms, can be used to receive the
output of the graphics method such a Circle, Line and Point.
To draw a line in the picture box control, the
line method is used.
Picture1.Line(x1,y1)-(x2,
y2)
Where x1, y1 are the coordinates of the
starting point of the line and x2, y2 are the coordinates of the end point of
the line.
Syntax for circle method:
Circle(x,y),r
Private Sub-Command1_Click()
Picture1.Line(10,10)-(1000, 1000)
Circle( 1200,1000),750
End Sub
6. Image Control:The image control can be used to display the images on the form. It supports the same picture format as that of picture box control.
Picture property: The picture property of the image
control is used to load the pictures at design time
Private Sub Command1_click()
Image1.Picture= Loadpicture(“C:\apple.jpg”)
End Sub
Stretch property: The stretch property determine whether the picture is stretch when loaded, to the size of the image control at the design time.
Stretching the picture can be produced the loss of the image quality
7. Option Button: An option button control displays an option
that can be turned on or off.
Option buttons are also called as a radio button
since you can tune into only one channel at a time. Usually option button
controls are used in an option group to display options from which the user can
select only one.
Option button control can be grouped by drawing them inside a container such as frame control.
The value property of the option button control can be used to identify whether the option button is currently selected or not. If the option button is currently selected then its value property is true otherwise it is false.
 |
| Option Button |
Private Sub Command1_click()
If Option1.value= True then
Msgbox “Male”
Else
Msgbox “Female”
End If
End Sub
8. Checkbox: The checkbox control officer list of choices from which the user can select as many options as required. Checkbox control displays checkmarks when it is selected. It is commonly used to present Yes/No or True/ False selection to the user.
Value property: The value property of the checkbox control indicates whether the checkbox is checked or unchecked.
When the checkbox is selected the value is set to 1 otherwise it
is 0.
Private Sub Command1_click()
If Check1. Value=1 Then
Text1.FontBold= True
ElseIf Check1.Value=0 Then
Text1.FontBold= False
End If
If Check2. Value=1 Then
Text1.FontItalic= True
ElseIf Check2.Value=0 Then
Text1.FontItalic= False
End If
If Check3. Value=1 Then
Text1.FontUnderline= True
ElseIf Check3.Value=0 Then
Text1.FontUnderline= False
End If
End Sub
 |
| Check Box |
9. Scrollbar: Scrollbar control is a visual basic control
containing a thumb, you can move the scrollbar by dragging it, clicking
the mouse to either side of the scrollbar, are using the keyboard.
Scrollbar control are useful when you want to select a discrete
value or for a set of only creative values in a range.
When become of the scrollbar is moved, the current value of the scrollbar is changed.
There are two type of scroll bar available in toolbox:
- Horizontal
scroll bar
- Vertical
scroll bar
Properties:
- Max Property: Set the maximum value
of the thumb of the scrollbar reaches its extreme right
- Min property : Set the minimum value Hindi
thumb of the scrollbar reaches its extreme left
- Smallchange property: Set the amount of
increase or decrease in the value if the user Clicks on the arrow pointing
to the left or right
- Value property: It is the value
corresponding to the position of the scroll box in the scroll bar
- Change event: The change event of the
scrollbar is executed as the current value of the scrollbar is
changed. The scrollbar value is changed when the scroll bar thumb is
more either left or right.
 |
| HScroll & VScroll |
Private Sub Hscroll1_Change()
Text1.text= Hscroll1.Value
End Sub
Private Sub Vscroll1_Change()
Text2.text= Vscroll1.Value
End Sub
Array of controls:
An array is defined as a group of elements of similar type. Similarly
to an array of integers, single, string an array of control can be created.
All the control in the control array will share the same name
The individual element in the control array can be referred using
an index which begins with 0.
To create an array
- Place the control on the form
- Copy the control
- Past control
For example to create an Array of command buttons, place a
command button on the form, copy and paste it.
The first button is now referred as a command1 (0), second
one as command1 (1) and so on.
The code in the click event can be specified as,
Private Sub Command1_Click (index as integer)
End Sub
The index of the button click is passed as an argument to the
procedure.
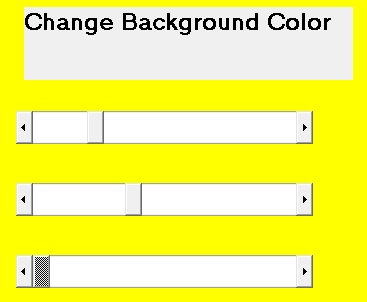
Setting
the background color of the form using three scroll bars
Place a horizontal scrollbar on the form, right click on the
scroll bar and select copy and click on the paste.
It creates the control array of the scrollbar on the
form. Again paste one more scrollbar on the form
The first scrollbar is identified as Hscroll1(0), Second scroll bar as Hscroll1(1) while the third as Hscroll1(2).
 |
| Array of Control |
Form1.Backcolor=
RGB(Hscroll1(0).Value,Hscroll1(1).Value,Hscroll1(2).Value)
End Sub
10. Frame: Frame control can be used to group the control
in it. It is commonly used to group the radio button as only one radio
button can be selected from the individual group.
Frame control provides an identifiable grouping of controls. You
can also use a frame to subdivide a form functionally- for example
separate group option buttons.
To group controls, first draw the frame control and
then draw the controls inside the frame. This enables you to move the
frame and the control it contains together. If you draw the control
outside the frame and then try to move It Inside, The control will be on
top of the frame and you will have to move the frame and control separately.
 |
| Frame |
11. File Control:
Driver list box: Drive list box control enables a user to
select a valid disc drive at runtime. Use this control to display a list
of all the valid drivers in the user system
Directory list box: A directory
list box control display directories and path at runtime. Use this
control to display the hierarchical list of directories
File list box: If file list box
control locates and list file in the directory specified by the path property
at runtime. Use this control to display a list of files selected by file
type
Private Sub Form_Load()
Drive1.Drive=”C:\”
End Sub
Private Sub Drive1_Change()
Dir1.Path=Drive1.Drive
End Sub
Private Sub Dir1_Change()
File1.Path= Dir1.Path
End Sub
 |
| Drive List Box |
 |
| Directory List |
 |
| File List |