Tuesday, September 22, 2020

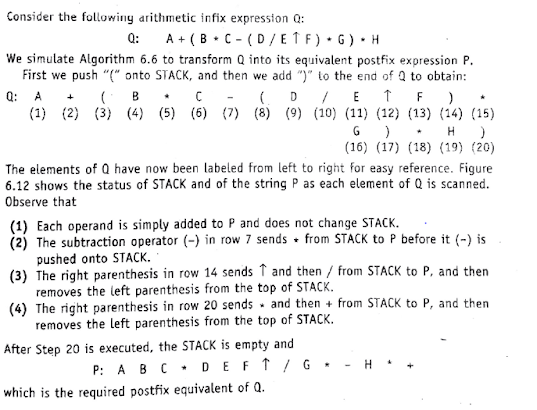
Transforming Infix Expression into Postfix Expressions:

 Let Q be an arithmetic expression written in infix notation. This algorithm transforms the infix expression into postfix expressions.


POLISH(Q, P)

Support Q is an arithmetic expression written in infix notation.  This algorithm finds the equivalent postfix expression P.

  1. Push “(” Onto STACK, and add “)”  to the end of Q.

  2. Scan Q from left to right and repeat step 3 to 6 for each element of Q until the stack is empty:

  3.  If an operand is encountered,  add it to P.

  4.  If left parenthesis is encountered,  push it onto  STACK.

  5.  If an operator is encountered, then:

    1. Repeatedly pop from stack and add to P  each operator (on the top of the STACK) which has the same precedence or higher precedence than the operator

    2.  Add operator to STACK

[End of If structure]

  1.  If a right  parenthesis encounter, then :

    1.  Repeatedly pop from the stack and add it to P each operator (on the top of the stack) until a left parenthesis is encountered.

    2.  Remove the left [Do not add the left parenthesis to P].

  [End of if  structure]

  [End of step 2 loop]

  1. Exit


Towers of Hanoi:

Suppose 3 pegs, labelled A, B and C, are given, and suppose on peg A there are placed a finite number of N of disks with decreasing size.  The objective of the game is to move the disk from Peg A to Peg C using Peg B as an auxiliary.

The rules of the game are as follows:

  1. Only one disk may be moved at a time, specifically,  only top disks on any peg may be moved to any other peg.
  2. At no time a larger disks placed on smaller disks.


Initial Setup of Towers of Hanoi with n=6

 Sometimes we will write X->Y  to denote the instruction “ Move top disk from peg X to Peg Y”  where X and Y may be any of the three pegs.

The solution of the Tower of Hanoi problem for n = 3 shown in figure.

n=3 :               Move top disc from peg A to Peg C

Move top disc from peg A to Peg B

Move top disc from peg C to Peg B

Move top disc from peg A to Peg C

Move top disc from peg B to Peg A

Move top disc from peg B to Peg C

Move top disc from peg A to Peg C


In other words,

n=3,   

A->C,              A->B,              C->B,              A->C,             B->A,                         B->C,              A->C

We also give the solution to the Tower of Hanoi problem for n=1 and n=2.

n=1                 A->C

n=2                 A->B,              A->C,              B->C


Rather than finding a separate solution for each n,   we use the technique of recursion to develop a general solution.  first we observed that the solution of the Tower of Hanoi problem for n >1  disk may be reduced to the following some sub problem.

  1. Move the top n-1 disks from peg A to peg B
  2. Move the top n disks from peg A to peg C : A->C
  3. Move the top n-1 disks from peg B to peg 
Let us now introduce a general solution

                               TOWER (N, BEG, AUX, END)

To denote a procedure which moves the top n disks from the initial peg BEG to final peg END using the AUX as an auxiliary.  When n = 1 we have a following solution:

TOWER (1, BEG, AUX, END) Consist of the single instruction BEG->END

When n>1, the solution may be reduced to the solution of the following three sub problems:

TOWER(N-1, BEG, END, AUX)

  1. TOWER(1, BEG, AUX, END) or BEG->END
  2. TOWER(N-1, AUX, BEG, END)
  3. TOWER(N-1, AUX, BEG, END)

TOWER (4, A, B, C)


Procedure: TOWER (N, BEG, END, AUX)

This procedure gives a recursive solution of the Tower of Hanoi problem for N disks.

 1.         If N=1, then :

    1. Write BEG->END
    2. Return.

[End of if Structure]

2.            [Move N-1 disks from peg BEG to peg AUX]    

Call TOWER (N-1, BEG, END, AUX)

3.            Write: BEG-> END

4.            [Move N-1 disks from peg AUX to peg END]

Call TOWER (N-1, AUX, BEG, END)

5.            Return.


Tuesday, September 15, 2020

Creating Menus in VB

Menu bar is one of the foundation controls in any window based application.  The list of menus is a display in the menu bar.  The menu options are display when the individual menu is clicked.

The menu editor is used to create the menu on the form.

To display the menu editor:

Right click on the form and select the option Menu Editor from the menu displayed.

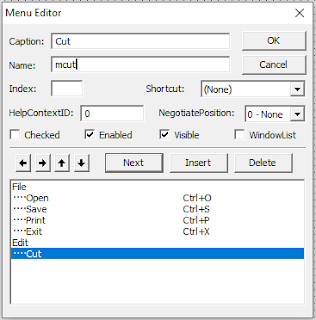
Menu Editor Dialogue Box:


 Allow you to create custom menu for your application and to define their properties.

Dialogue Box Options:

Caption:  Allow you to enter the menu or command name that you want to appears on your menu bar or in a menu.

Name: Allow you to enter a control name for the menu item. A control name is an identifier used only to access the menu item in code; it doesn't appear in a menu.

Shortcut:

 Allow you to select a shortcut key for each command. i.e.  the combination with Ctrl  key.

E.g.  Shortcut to save command is Ctrl+S 

Checked:

Allow you to have a check marks appear initially at the left of a menu item.  It is generally used to indicate whether a toggle option is turned on or off.

Enabled:

Allow you to select whether you want the menu item to respond to event, or clear if you want the item to be unavailable and appears dimmed.

Visible:

 Allow you to have the menu item appears on the menu.

Right arrow:

Moves the selected menu down one level each time you click it.  You can create up to four level of submenu.

Left Arrow:

Move the selected menu up one level each time you click it. You can create up to four level of submenu.

Down Arrow:

Move the selected menu item down one position within the same menu label each time you check it.

Menu List:

A list box that displays a hierarchical list of menu items. Submenu items are intended to indicate their hierarchical position or level.

Next:

 Moves selection to the next line

Insert:

 Insert a line in the list box above the currently selected line

 Delete:

Delete the currently selected line

Ok:

Closes the Menu Editor and applies all changes to the last for you selected.

Cancel:

Closes the Menu Editor and cancels all changes.

Step to create menus as a displayed on the following form:


  1. Right click on the form and select the option Menu Editor from the menu displayed
  2. Enter the caption and name of the main menu ‘Abcd’.
  3. Click on the next button.
  4. Enter the name and caption of the menu item ‘a’
  5. Since ‘a’  is a menu option and not the main menu,  it is to be preceded with dots hence click on the right arrow button(->) to place the dots ahead of it.
  6. Click on the Next button
  7. Enter the name and caption of the menu item  ’b’
  8. Click on the Next button
  9. Enter the name and caption for the item ‘x’.  Since ‘x’ is a submenu of the menu item ‘b’ and hence it is to be preceded with double the number of dots.  Click on the right arrow button(->)
  10.  Click on the Next button.
  11.  Enter the name and caption of menu ‘y’
  12. Click on next button.
  13. Enter the name and the caption of menu ‘c’
  14. To remove the additional dots head of the menu ‘c’ click on the left arrow button (<-).

Popup Menus:

A menu which is displayed, when the control click with the right mouse button is called as popup menu.

A popup menu is a floating menu that is display over a form, independent of the menu bar.  The items displayed on the popup menu depend on where the pointer was located when the right mouse button was pressed; therefore, popup menus are also called as context menus.

Syntax to display the popup menu is as follows:

object.popupMenu  menuname

Program to display the pop-up menu when the command is right  clicked.

Create a menu in the menu editor.  Set the visible property of the menu false in the menu editor

Use the popup menu method in the mouse down event of the control to display the menu  when the control is right  clicked.

Privates Sub Button1_ MouseDown( Button as integer,  Shift as integer,  X as Single , Y as Single)

If Button =2 Then

Popupmenu  abcd

End if

End sub


Tuesday, September 1, 2020

Modules in VB:

Form Module: The form that you can see on the screen is a representation of the properties that define its appearance and behavior of a component place on it.  For each form in an application there is a related form module that contains its code.

Each form module contains event procedure which is a section of the code where you place the instruction that will execute in response to specific event.  Form can contain controls.  For each control on the form there is a corresponding state of event procedure in the form module.  In addition to the event procedure, form module can contain the general procedure that is executed in response to a call from any event procedure.

To add a new form to the project, from the project menu select the option “Add Form”, selected type of the form and click on open button.

Standard Module:

This standard module can be used to declare the global data and the global methods which can be accessed anywhere in the project or an application.

Code that isn't related to a specific form control can be place in a different type of module, standard module (.BAS)

To add a standard module into the project, from the project menu select an option “Add Module”, and click on “open” button

Class Module:

A class module is used to create object that can be called from procedure within your application.  Where as a standard module contain only code, a class module contain both code and data.

The members in the class module can only be accessed through its object.  One class can be defining in one class module.

To add a new Class module to the project, from the project menu select the option “Add Class Module”, select the type of the class and click on open button.

By default, your project contains a single form module.  User can add additional form, class and standard module, as needed.