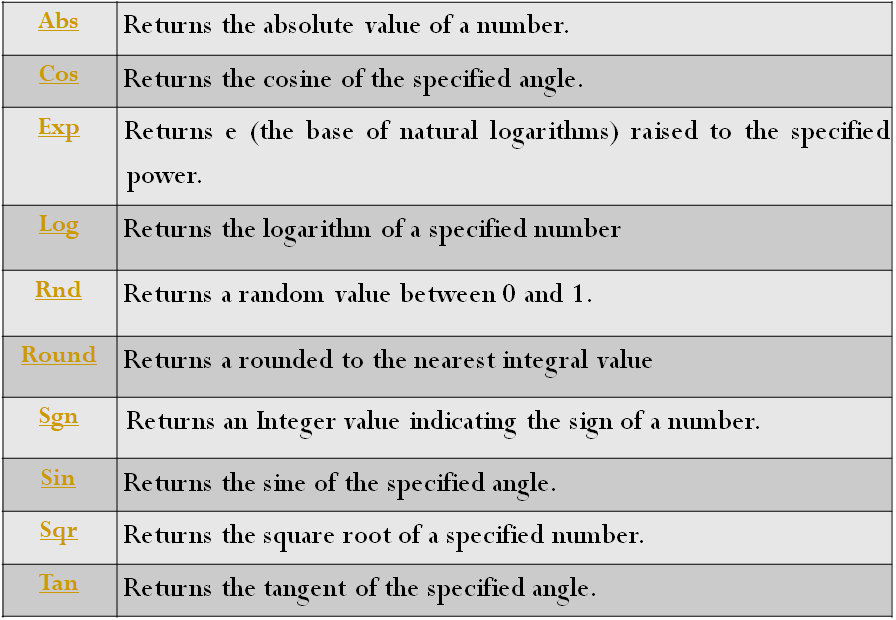
Menu bar is one of the foundation controls in any window based application. The list of menus is a display in the menu bar. The menu options are display when the individual menu is clicked.
The menu editor is used to create the menu on the
form.
To display the menu editor:
Right click on the form and select the option Menu Editor from the menu displayed.
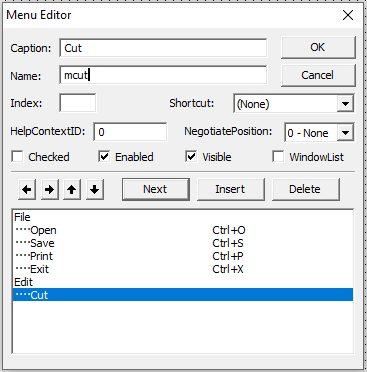
Menu Editor Dialogue Box:

Allow you to create custom menu for your application and to define their properties.
Dialogue Box Options:
Caption: Allow you to enter the menu or command name that you want to appears on your menu bar or in a menu.
Name: Allow you to enter a control name for the menu item. A control name is an identifier used only to access the menu item in code; it doesn't appear in a menu.
Shortcut:
Allow you to select a shortcut key for
each command. i.e. the combination with Ctrl key.
E.g. Shortcut to save command is
Ctrl+S
Checked:
Allow you to have a check marks appear
initially at the left of a menu item. It is generally used to indicate
whether a toggle option is turned on or off.
Enabled:
Allow you to select whether you want the menu item
to respond to event, or clear if you want the item to be unavailable and
appears dimmed.
Visible:
Allow you to have the menu item appears on
the menu.
Right arrow:
Moves the selected menu down one level each time
you click it. You can create up to four level of submenu.
Left Arrow:
Move the selected menu up one level each
time you click it. You can create up to four level of submenu.
Down
Arrow:
Move the selected menu item down one position
within the same menu label each time you check it.
Menu List:
A list box that displays a hierarchical list
of menu items. Submenu items are intended to indicate their hierarchical
position or level.
Next:
Moves selection to the next line
Insert:
Insert a line in the list box above the currently
selected line
Delete:
Delete the currently selected line
Ok:
Closes the Menu Editor and applies all
changes to the last for you selected.
Cancel:
Closes the Menu Editor and cancels all
changes.
Step to create menus as a displayed on the following form:

- Right click on the form and select the option Menu Editor
from the menu displayed
- Enter the caption and name of the main menu ‘Abcd’.
- Click on the next button.
- Enter the name and caption of the menu item ‘a’
- Since ‘a’ is a menu option and not the main
menu, it is to be preceded with dots hence click on the right arrow
button(->) to place the dots ahead of it.
- Click on the Next button
- Enter the name and caption of the menu item ’b’
- Click on the Next button
- Enter the name and caption for the item ‘x’.
Since ‘x’ is a submenu of the menu item ‘b’ and hence it is to
be preceded with double the number of dots. Click on the right arrow
button(->)
- Click on the Next button.
- Enter the name and caption of menu ‘y’
- Click on next button.
- Enter the name and the caption of menu ‘c’
- To remove the additional dots head of the menu ‘c’
click on the left arrow button (<-).
Popup Menus:
A menu which is displayed, when the control click with the right mouse button is called as popup menu.
A popup menu is a floating menu that is display over a form, independent of the menu bar. The items displayed on the popup menu depend on where the pointer was located when the right mouse button was pressed; therefore, popup menus are also called as context menus.
Syntax to display the popup menu is as follows:
object.popupMenu menuname
Program to display the pop-up menu when the command is right clicked.
Create a menu in the menu editor. Set the visible property of the menu false in the menu editor
Use the popup menu method in the mouse down event of the control to display the menu when the control is right clicked.
Privates Sub Button1_ MouseDown( Button as integer, Shift as integer, X as Single , Y as Single)
If Button =2 Then
Popupmenu abcd
End if
End sub